
Java Server Pages
What is JavaServer Pages?
JavaServer Pages (JSP) is a technology for developing web pages that support dynamic content which helps developers insert java code in HTML pages by making use of special JSP tags, most of which start with <% and end with %>.
A Java Server Pages component is a type of Java Servlet that is designed to fulfill the role of a user interface for a Java web application. Web developers write JSPs as text files that combine HTML or XHTML code, XML elements, and embedded JSP actions and commands.
Using JSP, you can collect input from users through web page forms, present records from a database or another source, and create web pages dynamically.
JSP tags can be used for a variety of purposes, such as retrieving information from a database or registering user preferences, accessing JavaBeans components, passing control between pages and sharing information between requests, pages etc.
Why Use JSP?
JSP often serve the same purpose as programs implemented using the Common Gateway Interface (CGI). But JSP offer several advantages in comparison with the CGI.
Performance is significantly better because JSP allows embedding Dynamic Elements in HTML Pages itself instead of having a separate CGI files.
JSP are always compiled before it's processed by the server unlike CGI/Perl which requires the server to load an interpreter and the target script each time the page is requested.
JSP are built on top of the Java Servlets API, so like Servlets, JSP also has access to all the powerful Enterprise Java APIs, including JDBC, JNDI, EJB, JAXP etc.
JSP pages can be used in combination with servlets that handle the business logic, the model supported by Java servlet template engines.
Finally, JSP is an integral part of Java EE, a complete platform for enterprise class applications. This means that JSP can play a part in the simplest applications to the most complex and demanding.
Advantages of JSP:
Separation of static from dynamic content: With servlets, the logic for generation of the dynamic content is an intrinsic part of the servlet itself, and is closely tied to the static presentation templates responsible for the user interface. Thus, even minor changes made to the UI typically result in the recompilation of the servlet. This tight coupling of presentation and content results in brittle, inflexible applications. However, with JSP, the logic to generate the dynamic content is kept separate from the static presentation templates by encapsulating it within external JavaBeans components. These are then created and used by the JSP page using special tags and scriptlets. When a page designer makes any changes to the presentation template, the JSP page is automatically recompiled and reloaded into the web server by the JSP engine.
Write Once Run Anywhere: JSP technology brings the "Write Once, Run Anywhere" paradigm to interactive Web pages. JSP pages can be moved easily across platforms, and across web servers, without any changes.
Dynamic content can be served in a variety of formats: There is nothing that mandates the static template data within a JSP page to be of a certain format. Consequently, JSP can service a diverse clientele ranging from conventional browsers using HTML/DHTML, to handheld wireless devices like mobile phones and PDAs using WML, to other B2B applications using XML.
Completely leverages the Servlet API: If you are a servlet developer, there is very little that you have to "unlearn" to move over to JSP. In fact, servlet developers are at a distinct advantage because JSP is nothing but a high-level abstraction of servlets. You can do almost anything that can be done with servlets using JSP--but more easily!
Following is the list of other advantages of using JSP over other technologies:
vs. Active Server Pages (ASP): The advantages of JSP are twofold. First, the dynamic part is written in Java, not Visual Basic or other MS specific language, so it is more powerful and easier to use. Second, it is portable to other operating systems and non-Microsoft Web servers.
vs. Pure Servlets: It is more convenient to write (and to modify!) regular HTML than to have plenty of println statements that generate the HTML.
vs. Server-Side Includes (SSI): SSI is really only intended for simple inclusions, not for "real" programs that use form data, make database connections, and the like.
vs. JavaScript: JavaScript can generate HTML dynamically on the client but can hardly interact with the web server to perform complex tasks like database access and image processing etc.
vs. Static HTML: Regular HTML, of course, cannot contain dynamic information.
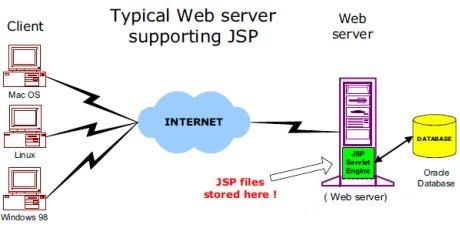
The web server needs a JSP engine ie. container to process JSP pages. The JSP container is responsible for intercepting requests for JSP pages. This tutorial makes use of Apache which has built-in JSP container to support JSP pages development.
A JSP container works with the Web server to provide the runtime environment and other services a JSP needs. It knows how to understand the special elements that are part of JSPs.
Following diagram shows the position of JSP container and JSP files in a Web Application.
JSP Processing:
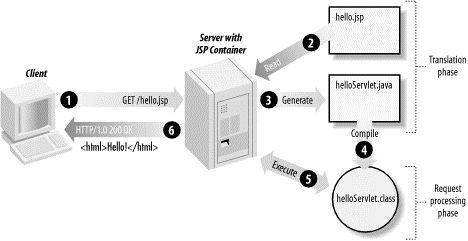
The following steps explain how the web server creates the web page using JSP:
As with a normal page, your browser sends an HTTP request to the web server.
The web server recognizes that the HTTP request is for a JSP page and forwards it to a JSP engine. This is done by using the URL or JSP page which ends with .jsp instead of .html.
The JSP engine loads the JSP page from disk and converts it into Servlet content. This conversion is very simple in which all template text is converted to println( ) statements and all JSP elements are converted to Java code that implements the corresponding dynamic behavior of the page.
The JSP engine compiles the servlet into an executable class and forwards the original request to a servlet engine.
A part of the web server called the servlet engine loads the Servlet class and executes it. During execution, the servlet produces an output in HTML format, which the servlet engine passes to the web server inside an HTTP response.
The web server forwards the HTTP response to your browser in terms of static HTML content.
Finally web browser handles the dynamically generated HTML page inside the HTTP response exactly as if it were a static page.
All the above mentioned steps can be shown below in the following diagram:
Typically, the JSP engine checks to see whether a servlet for a JSP file already exists and whether the modification date on the JSP is older than the servlet. If the JSP is older than its generated servlet, the JSP container assumes that the JSP hasn't changed and that the generated servlet still matches the JSP's contents. This makes the process more efficient than with other scripting languages (such as PHP) and therefore faster.
So in a way, a JSP page is really just another way to write a servlet without having to be a Java programming wiz. Except for the translation phase, a JSP page is handled exactly like a regular servlet
The key to understanding the low-level functionality of JSP is to understand the simple life cycle they follow.
A JSP life cycle can be defined as the entire process from its creation till the destruction which is similar to a servlet life cycle with an additional step which is required to compile a JSP into servlet.
The following are the paths followed by a JSP
Compilation
Initialization
Execution
Cleanup
The four major phases of JSP life cycle are very similar to Servlet Life Cycle and they are as follows:
JSP Compilation:
When a browser asks for a JSP, the JSP engine first checks to see whether it needs to compile the page. If the page has never been compiled, or if the JSP has been modified since it was last compiled, the JSP engine compiles the page.
The compilation process involves three steps:
Parsing the JSP.
Turning the JSP into a servlet.
Compiling the servlet.
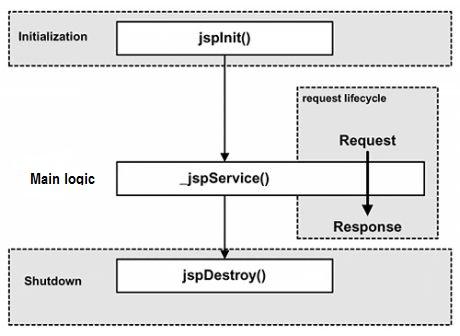
JSP Initialization:
When a container loads a JSP it invokes the jspInit() method before servicing any requests. If you need to perform JSP-specific initialization, override the jspInit() method:
public void jspInit(){
// Initialization code...
}
Typically initialization is performed only once and as with the servlet init method, you generally initialize database connections, open files, and create lookup tables in the jspInit method.
JSP Execution:
This phase of the JSP life cycle represents all interactions with requests until the JSP is destroyed.
Whenever a browser requests a JSP and the page has been loaded and initialized, the JSP engine invokes the _jspService() method in the JSP.
The _jspService() method takes an HttpServletRequest and an HttpServletResponse as its parameters as follows:
void _jspService(HttpServletRequest request, HttpServletResponse response)
{
// Service handling code...
}
The _jspService() method of a JSP is invoked once per a request and is responsible for generating the response for that request and this method is also responsible for generating responses to all seven of the HTTP methods ie. GET, POST, DELETE etc.
JSP Cleanup:
The destruction phase of the JSP life cycle represents when a JSP is being removed from use by a container.
The jspDestroy() method is the JSP equivalent of the destroy method for servlets. Override jspDestroy when you need to perform any cleanup, such as releasing database connections or closing open files.
The jspDestroy() method has the following form:
public void jspDestroy()
{
// Your cleanup code goes here.
}
Reading Form Data using JSP
JSP handles form data parsing automatically using the following methods depending on the situation:
getParameter(): You call request.getParameter() method to get the value of a form parameter.
getParameterValues(): Call this method if the parameter appears more than once and returns multiple values, for example checkbox.
getParameterNames(): Call this method if you want a complete list of all parameters in the current request.
getInputStream(): Call this method to read binary data stream coming from the client.
GET Method Example Using URL:
Here is a simple URL which will pass two values to HelloForm program using GET method.
http://localhost:8080/main.jsp?first_name=tycs&last_name=2014
Below is main.jsp JSP program to handle input given by web browser. We are going to usegetParameter() method which makes it very easy to access passed information:
<html>
<head>
<title>Using GET Method to Read Form Data</title>
</head>
<body>
<center>
<h1>Using GET Method to Read Form Data</h1>
<ul>
<li><p><b>First Name:</b>
<%= request.getParameter("first_name")%>
</p></li>
<li><p><b>Last Name:</b>
<%= request.getParameter("last_name")%>
</p></li>
</ul>
</body>
</html>
Now type http://localhost:8080/main.jsp?first_name=tycs&last_name=2014 in your browser's Location:box. This would generate following result:
GET Method Example Using Form:
Here is a simple example which passes two values using HTML FORM and submit button. We are going to use same JSP main.jsp to handle this input.
<html>
<body>
<form action="main.jsp" method="GET">
First Name: <input type="text" name="first_name">
<br />
Last Name: <input type="text" name="last_name" />
<input type="submit" value="Submit" />
</form>
</body>
</html>
When you would access http://localhost:8080/Hello.html, below is the actual output of the above form.
Top of Form
First Name:
Last Name:
Bottom of Form
Try to enter First and Last Name and then click submit button to see the result on your local machine where tomcat is running.
Based on the input provided, it would generate similar result as mentioned in the above examples.
POST Method Example Using Form:
Let us do little modification in the above JSP to handle GET as well as POST methods. Below ismain.jsp JSP program to handle input given by web browser using GET or POST methods.
Infact there is no change in above JSP because only way of passing parameters is changed and no binary data is being passed to the JSP program. File handling related concepts would be explained in separate chapter where we need to read binary data stream.
<html>
<head>
<title>Using GET and POST Method to Read Form Data</title>
</head>
<body>
<center>
<h1>Using GET Method to Read Form Data</h1>
<ul>
<li><p><b>First Name:</b>
<%= request.getParameter("first_name")%>
</p></li>
<li><p><b>Last Name:</b>
<%= request.getParameter("last_name")%>
</p></li>
</ul>
</body>
</html>
Following is the content of Hello.html file:
<html>
<body>
<form action="main.jsp" method="POST">
First Name: <input type="text" name="first_name">
<br />
Last Name: <input type="text" name="last_name" />
<input type="submit" value="Submit" />
</form>
</body>
</html>
Now let us keep main.jsp and hello.htm in <Tomcat-installation-directory>/webapps/ROOT directory. When you would access http://localhost:8080/Hello.htm, below is the actual output of the above form.
Top of Form
First Name:
Last Name:
Bottom of Form
Try to enter First and Last Name and then click submit button to see the result on your local machine where tomcat is running.
Based on the input provided, it would generate similar result as mentioned in the above examples.
Passing Checkbox Data to JSP Program
Checkboxes are used when more than one option is required to be selected.
Here is example HTML code, CheckBox.htm, for a form with two checkboxes
<html>
<body>
<form action="main.jsp" method="POST" target="_blank">
<input type="checkbox" name="maths" checked="checked" /> Maths
<input type="checkbox" name="physics" /> Physics
<input type="checkbox" name="chemistry" checked="checked" />
Chemistry
<input type="submit" value="Select Subject" />
</form>
</body>
</html>
The result of this code is the following form
Top of Form
Maths Physics Chemistry
Bottom of Form
Below is main.jsp JSP program to handle input given by web browser for checkbox button.
<html>
<head>
<title>Reading Checkbox Data</title>
</head>
<body>
<center>
<h1>Reading Checkbox Data</h1>
<ul>
<li><p><b>Maths Flag:</b>
<%= request.getParameter("maths")%>
</p></li>
<li><p><b>Physics Flag:</b>
<%= request.getParameter("physics")%>
</p></li>
<li><p><b>Chemistry Flag:</b>
<%= request.getParameter("chemistry")%>
</p></li>
</ul>
</body>
</html>
For the above example, it would display following result:
Reading All Form Parameters:
Following is the generic example which uses getParameterNames() method of HttpServletRequest to read all the available form parameters. This method returns an Enumeration that contains the parameter names in an unspecified order.
Once we have an Enumeration, we can loop down the Enumeration in the standard manner, usinghasMoreElements() method to determine when to stop and using nextElement() method to get each parameter name.
<%@ page import="java.io.*,java.util.*" %>
<html>
<head>
<title>HTTP Header Request Example</title>
</head>
<body>
<center>
<h2>HTTP Header Request Example</h2>
<table width="100%" border="1" align="center">
<tr bgcolor="#949494">
<th>Param Name</th><th>Param Value(s)</th>
</tr>
<%
Enumeration paramNames = request.getParameterNames();
while(paramNames.hasMoreElements()) {
String paramName = (String)paramNames.nextElement();
out.print("<tr><td>" + paramName + "</td>\n");
String paramValue = request.getHeader(paramName);
out.println("<td> " + paramValue + "</td></tr>\n");
}
%>
</table>
</center>
</body>
</html>
Following is the content of Hello.htm:
<html>
<body>
<form action="main.jsp" method="POST" target="_blank">
<input type="checkbox" name="maths" checked="checked" /> Maths
<input type="checkbox" name="physics" /> Physics
<input type="checkbox" name="chemistry" checked="checked" /> Chem
<input type="submit" value="Select Subject" />
</form>
</body>
</html>
Now try calling JSP using above Hello.htm, this would generate a result something like as below based on the provided input:
Reading All Form Parameters
You can try above JSP to read any other form's data which is having other objects like text box, radio button or drop down box etc.
Elements involved with JSP development:
The Scriptlet:
A scriptlet can contain any number of JAVA language statements, variable or method declarations, or expressions that are valid in the page scripting language.
Following is the syntax of Scriptlet:
<% code fragment %>
Any text, HTML tags, or JSP elements you write must be outside the scriptlet. Following is the simple and first example for JSP:
<html><head><title>Hello World</title></head>
<body>Hello World!<br/>
<%
out.println("Your IP address is " + request.getRemoteAddr());%>
</body></html>
JSP Declarations:
A declaration declares one or more variables or methods that you can use in Java code later in the JSP file. You must declare the variable or method before you use it in the JSP file.
Following is the syntax of JSP Declarations:
<%! declaration; [ declaration; ]+ ... %>
Following is the simple example for JSP Declarations:
<%! int i = 0; %>
<%! int a, b, c; %>
<%! Circle a = new Circle(2.0); %>
<%! public String sayHello()
{
Return “Hello!!”;
}
%>
JSP Expression:
A JSP expression element contains a scripting language expression that is evaluated, converted to a String, and inserted where the expression appears in the JSP file.
Because the value of an expression is converted to a String, you can use an expression within a line of text, whether or not it is tagged with HTML, in a JSP file.
The expression element can contain any expression that is valid according to the Java Language Specification but you cannot use a semicolon to end an expression.
Following is the syntax of JSP Expression:
<%= expression %>
Following is the simple example for JSP Expression:
<html>
<head><title>A Comment Test</title></head>
<body>
<p>
Today's date: <%= new java.util.Date()%>
</p>
</body>
</html>
JSP Comments:
JSP comment marks text or statements that the JSP container should ignore. A JSP comment is useful when you want to hide or "comment out" part of your JSP page.
Following is the syntax of JSP comments:
<%-- This is JSP comment --%>
Following is the simple example for JSP Comments:
<html>
<head><title>A Comment Test</title></head>
<body>
<h2>A Test of Comments</h2>
<%-- This comment will not be visible in the page source --%>
</body>
</html>
There are a small number of special constructs you can use in various cases to insert comments or characters that would otherwise be treated specially. Here's a summary:
JSP Directives:
A JSP directive affects the overall structure of the servlet class. It usually has the following form:
<%@ directive attribute="value" %>
There are three types of directive tag:
The page Directive:
The page directive is used to provide instructions to the container that pertain to the current JSP page. You may code page directives anywhere in your JSP page. By convention, page directives are coded at the top of the JSP page.
Following is the basic syntax of page directive:
<%@ page attribute="value" %>
You can write XML equivalent of the above syntax as follows:
<jsp:directive.page attribute="value" />
Attributes:
Following is the list of attributes associated with page directive:
The include Directive:
The include directive is used to includes a file during the translation phase. This directive tells the container to merge the content of other external files with the current JSP during the translation phase. You may code include directives anywhere in your JSP page.
The general usage form of this directive is as follows:
<%@ include file="relative url" >
The filename in the include directive is actually a relative URL. If you just specify a filename with no associated path, the JSP compiler assumes that the file is in the same directory as your JSP.
The taglib Directive:
The JavaServer Pages API allows you to define custom JSP tags that look like HTML or XML tags and a tag library is a set of user-defined tags that implement custom behavior.
The taglib directive declares that your JSP page uses a set of custom tags, identifies the location of the library, and provides a means for identifying the custom tags in your JSP page.
The taglib directive follows the following syntax:
<%@ taglib uri="uri" prefix="prefixOfTag" >
Where the uri attribute value resolves to a location the container understands and the prefix attribute informs a container what bits of markup are custom actions.
Steps for creating custom tags in JSP:
Start with a new Web Application and within the source package select new package----give name mypkg.
Right click on mypkg->Java Class and write the code.
package mypkg;
import javax.servlet.jsp.tagext.*;
import javax.servlet.jsp.*;
import java.io.*;
public class HelloTag extends SimpleTagSupport {
StringWriter sw = new StringWriter();
private String message;
public void doTag() throws JspException, IOException {
if (message != null) {
/* Use message from attribute */
JspWriter out = getJspContext().getOut();
out.println( message );
}
else {
/* use message from the body */
getJspBody().invoke(sw);
getJspContext().getOut().println(sw.toString());
}
}
public void setMessage(String msg) {
message = msg;
}}
Right click on WEB-INF->Other->Web->Tag Library descriptor->give name mytag and write the code.
<taglib>
<tlib-version>1.0</tlib-version>
<jsp-version>2.0</jsp-version>
<short-name>Example TLD</short-name>
<tag>
<name>Hello</name>
<tag-class>mypkg.HelloTag</tag-class>
<body-content>scriptless</body-content>
<attribute>
<name>message</name>
<required>false</required>
</attribute>
</tag></taglib>
Goto index.jsp & type this code
<%@page contentType="text/html" pageEncoding="UTF-8"%>
<!DOCTYPE html>
<html>
<head>
<meta http-equiv="Content-Type" content="text/html; charset=UTF-8">
<title>JSP Page</title>
</head>
<body>
<%@taglib prefix="ty" uri="WEB-INF/tlds/mytag.tld" %>
<ty:Hello message="hurrahh">oooppsps</ty:Hello>
</body>
</html>
Run the JSP file.
JSP Actions:
JSP actions use constructs in XML syntax to control the behavior of the servlet engine. You can dynamically insert a file, reuse JavaBeans components, forward the user to another page, or generate HTML for the Java plugin.
There is only one syntax for the Action element, as it conforms to the XML standard:
<jsp:action_name attribute="value" />
Action elements are basically predefined functions and there are following JSP actions available:
Common Attributes:
There are two attributes that are common to all Action elements: the id attribute and the scope attribute.
Id attribute: The id attribute uniquely identifies the Action element, and allows the action to be referenced inside the JSP page. If the Action creates an instance of an object the id value can be used to reference it through the implicit object PageContext
Scope attribute: This attribute identifies the lifecycle of the Action element. The id attribute and the scope attribute are directly related, as the scope attribute determines the lifespan of the object associated with the id. The scope attribute has four possible values: (a) page, (b)request, (c)session, and (d) application.
The <jsp:include> Action
This action lets you insert files into the page being generated. The syntax looks like this:
<jsp:include page="relative URL" flush="true" />
Unlike the include directive, which inserts the file at the time the JSP page is translated into a servlet, this action inserts the file at the time the page is requested.
Following is the list of attributes associated with include action:
Example:
Let us define following two files (a)date.jps and (b) main.jsp as follows:
Following is the content of date.jsp file:
<p>
Today's date: <%= new java.util.Date()%>
</p>
Here is the content of main.jsp file:
<html>
<head>
<title>The include Action Example</title>
</head>
<body>
<center>
<h2>The include action Example</h2>
<jsp:include page="date.jsp" flush="true" />
</center>
</body>
</html>
The <jsp:useBean> Action
The useBean action is quite versatile. It first searches for an existing object utilizing the id and scope variables. If an object is not found, it then tries to create the specified object.
The simplest way to load a bean is as follows:
<jsp:useBean id="name" class="package.classname" archieve=”jare file name” />
Once a bean class is loaded, you can use jsp:setProperty and jsp:getProperty actions to modify and retrieve bean properties.
Following is the list of attributes associated with useBean action:
Let us discuss about jsp:setProperty and jsp:getProperty actions before giving a valid example related to these actions.
The <jsp:setProperty> Action
The setProperty action sets the properties of a Bean. The Bean must have been previously defined before this action. There are two basic ways to use the setProperty action:
You can use jsp:setProperty after, but outside of, a jsp:useBean element, as below:
<jsp:useBean id="myName" ... />
...
<jsp:setProperty name="myName" property="someProperty" .../>
In this case, the jsp:setProperty is executed regardless of whether a new bean was instantiated or an existing bean was found.
A second context in which jsp:setProperty can appear is inside the body of a jsp:useBean element, as below:
<jsp:useBean id="myName" ... >
...
<jsp:setProperty name="myName" property="someProperty" .../>
</jsp:useBean>
Here, the jsp:setProperty is executed only if a new object was instantiated, not if an existing one was found.
Following is the list of attributes associated with setProperty action:
The <jsp:getProperty> Action
The getProperty action is used to retrieve the value of a given property and converts it to a string, and finally inserts it into the output.
The getProperty action has only two attributes, both of which are required ans simple syntax is as follows:
<jsp:useBean id="myName" ... />
...
<jsp:getProperty name="myName" property="someProperty" .../>
Following is the list of required attributes associated with setProperty action:
Example:
Let us define a test bean which we will use in our example:
/* File: TestBean.java */
package action;
public class TestBean {
private String message = "No message specified";
public String getMessage() {
return(message);
}
public void setMessage(String message) {
this.message = message;
}
}
Now use the following code in main.jsp file which loads the bean and sets/gets a simple String parameter:
<html><head>
<title>Using JavaBeans in JSP</title>
</head><body><center>
<h2>Using JavaBeans in JSP</h2>
<jsp:useBean id="test" class="action.TestBean" />
<jsp:setProperty name="test" property="message" value="Hello JSP..." />
<p>Got message....</p>
<jsp:getProperty name="test" property="message" />
</center></body></html>
The <jsp:forward> Action
The forward action terminates the action of the current page and forwards the request to another resource such as a static page, another JSP page, or a Java Servlet.
The simple syntax of this action is as follows:
<jsp:forward page="Relative URL" />
Following is the list of required attributes associated with forward action:
Example:
Let us reuse following two files (a) date.jps and (b) main.jsp as follows:
Following is the content of date.jsp file:
<p>
Today's date: <%= new java.util.Date ()%>
</p>
Here is the content of main.jsp file:
<html>
<head>
<title>The include Action Example</title>
</head>
<body>
<center>
<h2>The include action Example</h2>
<jsp:forward page="date.jsp" />
</center>
</body>
</html>
Here it discarded content from main page and displayed content from forwarded page only.
The <jsp:plugin> Action
The plugin action is used to insert Java components into a JSP page. It determines the type of browser and inserts the <object> or <embed> tags as needed.
If the needed plugin is not present, it downloads the plugin and then executes the Java component. The Java component can be either an Applet or a JavaBean.
The plugin action has several attributes that correspond to common HTML tags used to format Java components. The <param> element can also be used to send parameters to the Applet or Bean.
Following is the typical syntax of using plugin action:
<jsp:plugin type="applet" codebase="dirname" code="MyApplet.class"
width="60" height="80">
<jsp:param name="fontcolor" value="red" />
<jsp:param name="background" value="black" />
<jsp:fallback>
Unable to initialize Java Plugin
</jsp:fallback>
</jsp:plugin>
A new element, the <fallback> element, can be used to specify an error string to be sent to the user in case the component fails.
Steps for creating & consuming applet in JSP:
Create the Java project
Choose File > New Project . Under Categories, select Java.
Specify the file's location in the Source Packages Folder text box.
Under Project Name, type HelloApplet.
Create the applet source file
Right-click the HelloApplet project node in the Projects window and select New > Other (Ctrl-N). Select Swing GUI Forms > JApplet Form.Click Next.
Under Class Name, type MyApplet. Under Package, type hello
Click Finish.
Write following source code:
package hello;
import java.applet.Applet;
import java.awt.Graphics;
public class MyApplet extends Applet {
@Override
public void paint(Graphics g) {
g.drawString("Hello applet!", 50, 25);
}
}
Right-click the HelloApplet project node ->Build.
Create the web project
Choose File > New Project.
Select Web Application in the Java Web category. Click Next.
Under Project Name, type HelloWebApplet.
Right-click the HelloWebApplet project node -> Properties ->Under Categories tab select Packaging->Click on Add Project button ->browse HelloApplet Project & then click on Add Project Jar button.
Goto index.jsp & type following code:
<html>
<body>
<jsp:plugin type="applet" code="helloapplet.MyApplet" archive="HelloApplet.jar" width="200" height="200"></jsp:plugin>
</body>
</html>
Run the JSP file.
The <jsp:element>, <jsp:attribute> and <jsp:body> actions are used to define XML elements dynamically. The word dynamically is important, because it means that the XML elements can be generated at request time rather than statically at compile time.
Following is a simple example to define XML elements dynamically:
<%@page language="java" contentType="text/html"%>
<html xmlns="http://www.w3c.org/1999/xhtml"
xmlns:jsp="http://java.sun.com/JSP/Page">
<head><title>Generate XML Element</title></head>
<body>
<jsp:element name="xmlElement">
<jsp:attribute name="xmlElementAttr">
Value for the attribute
</jsp:attribute>
<jsp:body>
Body for XML element
</jsp:body>
</jsp:element>
</body></html>
This would produce following HTML code at run time:
<html xmlns="http://www.w3c.org/1999/xhtml"
xmlns:jsp="http://java.sun.com/JSP/Page">
<head><title>Generate XML Element</title></head>
<body>
<xmlElement xmlElementAttr="Value for the attribute">
Body for XML element
</xmlElement>
</body></html>
The <jsp:text> Action:
The <jsp:text> action can be used to write template text in JSP pages and documents. Following is the simple syntax for this action:
<jsp:text>Template data</jsp:text>
The body fo the template cannot contain other elements; it can only contain text and EL expressions ( Note: EL expressions are explained in subsequent chapter). Note that in XML files, you cannot use expressions such as ${whatever > 0}, because the greater than signs are illegal. Instead, use the gt form, such as ${whatever gt 0} or an alternative is to embed the value in a CDATA section.
<jsp:text><![CDATA[<br>]]></jsp:text>
If you need to include a DOCTYPE declaration, for instance for XHTML, you must also use the <jsp:text> element as follows:
<jsp:text><![CDATA[<!DOCTYPE html
PUBLIC "-//W3C//DTD XHTML 1.0 Strict//EN"
"DTD/xhtml1-strict.dtd">]]>
</jsp:text>
<head><title>jsp:text action</title></head>
<body>
<books><book><jsp:text>
Welcome to JSP Programming
</jsp:text></book></books>
</body>
</html>
JSP Implicit Objects:
JSP supports nine automatically defined variables, which are also called implicit objects. These variables are:
The request Object:
The request object is an instance of a javax.servlet.http.HttpServletRequest object. Each time a client requests a page the JSP engine creates a new object to represent that request.
The request object provides methods to get HTTP header information including form data, cookies, HTTP methods etc.
The response Object:
The response object is an instance of a javax.servlet.http.HttpServletResponse object. Just as the server creates the request object, it also creates an object to represent the response to the client.
The response object also defines the interfaces that deal with creating new HTTP headers. Through this object the JSP programmer can add new cookies or date stamps, HTTP status codes etc.
The out Object:
The out implicit object is an instance of a javax.servlet.jsp.JspWriter object and is used to send content in a response.
The initial JspWriter object is instantiated differently depending on whether the page is buffered or not. Buffering can be easily turned off by using the buffered='false' attribute of the page directive.
The JspWriter object contains most of the same methods as the java.io.PrintWriter class. However, JspWriter has some additional methods designed to deal with buffering. Unlike the PrintWriter object, JspWriter throws IOExceptions.
Following are the important methods which we would use to write boolean char, int, double, object, String etc.
The session Object:
The session object is an instance of javax.servlet.http.HttpSession and behaves exactly the same way that session objects behave under Java Servlets.
The session object is used to track client session between client requests. We would see complete usage of session object in coming chapter: JSP - Session Tracking.
The application Object:
The application object is direct wrapper around the ServletContext object for the generated Servlet and in reality an instance of a javax.servlet.ServletContext object.
This object is a representation of the JSP page through its entire lifecycle. This object is created when the JSP page is initialized and will be removed when the JSP page is removed by the jspDestroy() method.
By adding an attribute to application, you can ensure that all JSP files that make up your web application have access to it.
The config Object:
The config object is an instantiation of javax.servlet.ServletConfig and is a direct wrapper around the ServletConfig object for the generated servlet.
This object allows the JSP programmer access to the Servlet or JSP engine initialization parameters such as the paths or file locations etc.
The following config method is the only one you might ever use, and its usage is trivial:
config.getServletName();
This returns the servlet name, which is the string contained in the <servlet-name> element defined in the WEB-INF\web.xml file
The pageContext Object:
The pageContext object is an instance of a javax.servlet.jsp.PageContext object. The pageContext object is used to represent the entire JSP page.
This object is intended as a means to access information about the page while avoiding most of the implementation details.
This object stores references to the request and response objects for each request. The application, config, session, and out objects are derived by accessing attributes of this object.
The pageContext object also contains information about the directives issued to the JSP page, including the buffering information, the errorPageURL, and page scope.
The PageContext class defines several fields, including PAGE_SCOPE, REQUEST_SCOPE, SESSION_SCOPE, and APPLICATION_SCOPE, which identify the four scopes. It also supports more than 40 methods, about half of which are inherited from the javax.servlet.jsp. JspContext class.
One of the important methods is removeAttribute, which accepts either one or two arguments. For example, pageContext.removeAttribute ("attrName") removes the attribute from all scopes, while the following code only removes it from the page scope:
pageContext.removeAttribute("attrName", PAGE_SCOPE);
You can check a very good usage of pageContext in coming chapter: JSP - File Uploading.
The page Object:
This object is an actual reference to the instance of the page. It can be thought of as an object that represents the entire JSP page.
The page object is really a direct synonym for the this object.
The exception Object:
The exception object is a wrapper containing the exception thrown from the previous page. It is typically used to generate an appropriate response to the error condition.
When a browser requests for a web page, it sends lot of information to the web server which can not be read directly because this information travel as a part of header of HTTP request.
The HttpServletRequest Object:
The request object is an instance of a javax.servlet.http.HttpServletRequest object. Each time a client requests a page the JSP engine creates a new object to represent that request.
The request object provides methods to get HTTP header information including form data, cookies, HTTP methods etc.
There are following important methods which can be used to read HTTP header in your JSP program. These method are available with HttpServletRequest object which represents client request to webserver.
The HttpServletResponse Object:
The response object is an instance of a javax.servlet.http.HttpServletRequest object. Just as the server creates the request object, it also creates an object to represent the response to the client.
The response object also defines the interfaces that deal with creating new HTTP headers. Through this object the JSP programmer can add new cookies or date stamps, HTTP status codes etc.
There are following methods which can be used to set HTTP response header in your servlet program. These method are available with HttpServletResponse object which represents server response.
There are following methods which can be used to set HTTP Status Code in your servlet program. These method are available with HttpServletResponse object.
 Reviewed by Asst. Prof. Sunita Rai
on
March 27, 2022
Rating:
Reviewed by Asst. Prof. Sunita Rai
on
March 27, 2022
Rating:


No comments: